For the past few weeks I have textured some of the outer pieces for my foundry as well as create a package and imported them into UDK, this will be the base my finished foundry. From past useage of UDK I now know how important it is to use correct name conventions for my assests as it will improve my work flow and help later in the project when there are alot more assets.
Below is as image of the outframe for my foundry.
Monday, 15 April 2013
Parallax Mapping
To create the texture for my Honours, I first start by getting a free source texture from a website like CGtextures.
Below is a the basic instruction of how I create my textures and parallax mapping.
I then added the height map to crazy bump (a normal generating program) after tweaking the options in the crazy bump I got the look I was after. I then create a alpha channel for my normal map in photoshop and add a image that looks like the oringal height map, but with one difference, it has slight blur to it, so the brick to mortor tanitstion better.
Parallax mapping works by adding a bump off set to the normal map and choosing the aphla channel I create as the off set. the glossieness the he brick will go when I add a spec map. I think this a greate techque and I will be using on other surfaces like floor and roofs, Any surface that is flat. as test with mesh like the bessemer produce some bad results.
Below is a the basic instruction of how I create my textures and parallax mapping.
The source image was a high res image, but was not seamless. so I created a seamless texture using photoshop. the Final seamless textures was then weather and save as a 512x512 texture
I was now at the stage where I had a defuse brick, from this I could now create the normal, specular and add parallax mapping. the Create this first I had to create a normal map. so I created a height map (bump) from the clean seamless brick texture.I then added the height map to crazy bump (a normal generating program) after tweaking the options in the crazy bump I got the look I was after. I then create a alpha channel for my normal map in photoshop and add a image that looks like the oringal height map, but with one difference, it has slight blur to it, so the brick to mortor tanitstion better.
![]() |
| Left (normal map) right (aphla channel) |
Parallax material in UDK break down and tweeking the paramitors.
![]() |
| Brick material in UDK with just Defuse |
![]() |
| Brick Material with Defuse and Normal maps |
![]() |
| Brick Material with Defuse and parallax mapping |
Parallax mapping works by adding a bump off set to the normal map and choosing the aphla channel I create as the off set. the glossieness the he brick will go when I add a spec map. I think this a greate techque and I will be using on other surfaces like floor and roofs, Any surface that is flat. as test with mesh like the bessemer produce some bad results.
Bessemer Process
The main piece to my foundry willl be the besseme. A the bessemer was a new way of mass-producing steel. It was invented around 1850. This will be a great way to give my foundry more historial perpose and instrest. It will also act as a way of dating the foundry around 1850s- 1900s.
The important in steel producion of the bessemer can folow in the website link below.
http://en.wikipedia.org/wiki/Bessemer_process
http://en.wikipedia.org/wiki/W_%26_J_Galloway_%26_Sons
The important in steel producion of the bessemer can folow in the website link below.
http://en.wikipedia.org/wiki/Bessemer_process
http://en.wikipedia.org/wiki/W_%26_J_Galloway_%26_Sons
New foundry design.
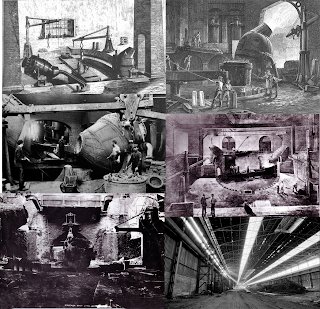
After looking at research image of real foundry and factories of the era, I noticed that my foundry design was too small and would not support and bessemer. So of this I change the design to closly match a image I found of a german foundry in 1880. Using the module pices I already created i design a shell for the factory struckture.
The advangtage of choosing a simlar design to the one above, This will give my honours project more meaning by foucing, by builtings the foundry around a historial break through in steel production, The Bessemer.
This design also has a add advantage that, the inside layout will be modular as well as and outter wall pieces. This design will fix correctly into the new foundry design and can be easily extrended and changed.

![]() |
| 1880s German Foundry
|
![]() |
| Basic 3D design of german foundry |
This design also has a add advantage that, the inside layout will be modular as well as and outter wall pieces. This design will fix correctly into the new foundry design and can be easily extrended and changed.
The modular foudry pieces can also be duplicated and changed and act as other buildings around the main foundry, that the player cannot walk into. this will be a great time saver and if the outter building need to be made more unqiue I create create some separate objects to make them stand out.
Sunday, 18 November 2012
Lowing the poly count.
Using the weld tool in 3Ds Max I cut down on the poly count by getting rid of unessary polys. This created more tri's but as it was goin into a game engine it didnt matter. After doin this I lower the poly count by almost half.
Modular pieces
I will create the modular pieces using 3Ds max, I have also created a custom unit and grid in 3Ds max which will snap to the grid in UDK. I create lots of different variations of wall and roofs piece. some of which have influence the design of my foundry. Below are a few examples of model pieces which I create and will not be using.
![]() |
| This design was scraped because the design looked too modern, The I decided to not use steel I beam and corrugated metal. |
![]() |
| I liked the design, but the arch was too narrow |
![]() |
| I widen the arches to give it a more industrial and added brick supports |
Below are some of the final designs for my modular pieces.
![]() |
| For these modular pieces I added a 3rd window to the side wall and added a front piece with arches. |
Theses pieces are always being tweeked to better design.
Blog Update
As ive not updated my for 5 weeks, I quickly recap what i have done.
I have garther research one my choosen environment a foundry. From this research I had design several layout for possible foundry designs. I also finalized the processes what which be shown in the foundry (bessemer process) and the era of the foundry (1880-1920). looking at the reference images of foundrys, I determined how many modular pieces I need to create in 3Ds max. But before I could model anything I needed to find out how to set up the unit scale in 3Ds max to UDK.
The choosen design is lot differnet compared to my first design. The new design will be uploaded in another post when it has been modeled in 3Ds max.
I have garther research one my choosen environment a foundry. From this research I had design several layout for possible foundry designs. I also finalized the processes what which be shown in the foundry (bessemer process) and the era of the foundry (1880-1920). looking at the reference images of foundrys, I determined how many modular pieces I need to create in 3Ds max. But before I could model anything I needed to find out how to set up the unit scale in 3Ds max to UDK.
![]() |
| My first foundry design + moodboard. |
Subscribe to:
Posts (Atom)